Network Notes: This app uses Google for web hosting and domain management. View the source (view-source: https://www.asveora.social) to verify these statements!

Intro & Requirements
Welcome to the getting started section! We are happy to know that you are
interested in becoming a citizen of Asveora! Keep in mind that this setup
guide is not in-depth and that if you are looking for specifically
detailed step-by-step instructions to complete a task, you should check
here. Because of this, the setup guide here assumes that you already have
some familiarity with the terminology of networking technology and digital
technology in general. Be sure that your device is capable of running a
modern web browser such as firefox, chrome, edge, safari, or any
derivatives such as waterfox, brave, etc.
Most devices can
these days so you should already be set to go! For setting up your Asveora
presence, we highly recommend having a computer or a device that you can
easily manage a content management system (CMS) with because it will be
crucial for many things. However, there are mobile options for interacting
with a CMS too. We implore you to carefully read the
constitution
before proceeding as it covers essential information for network
participation.
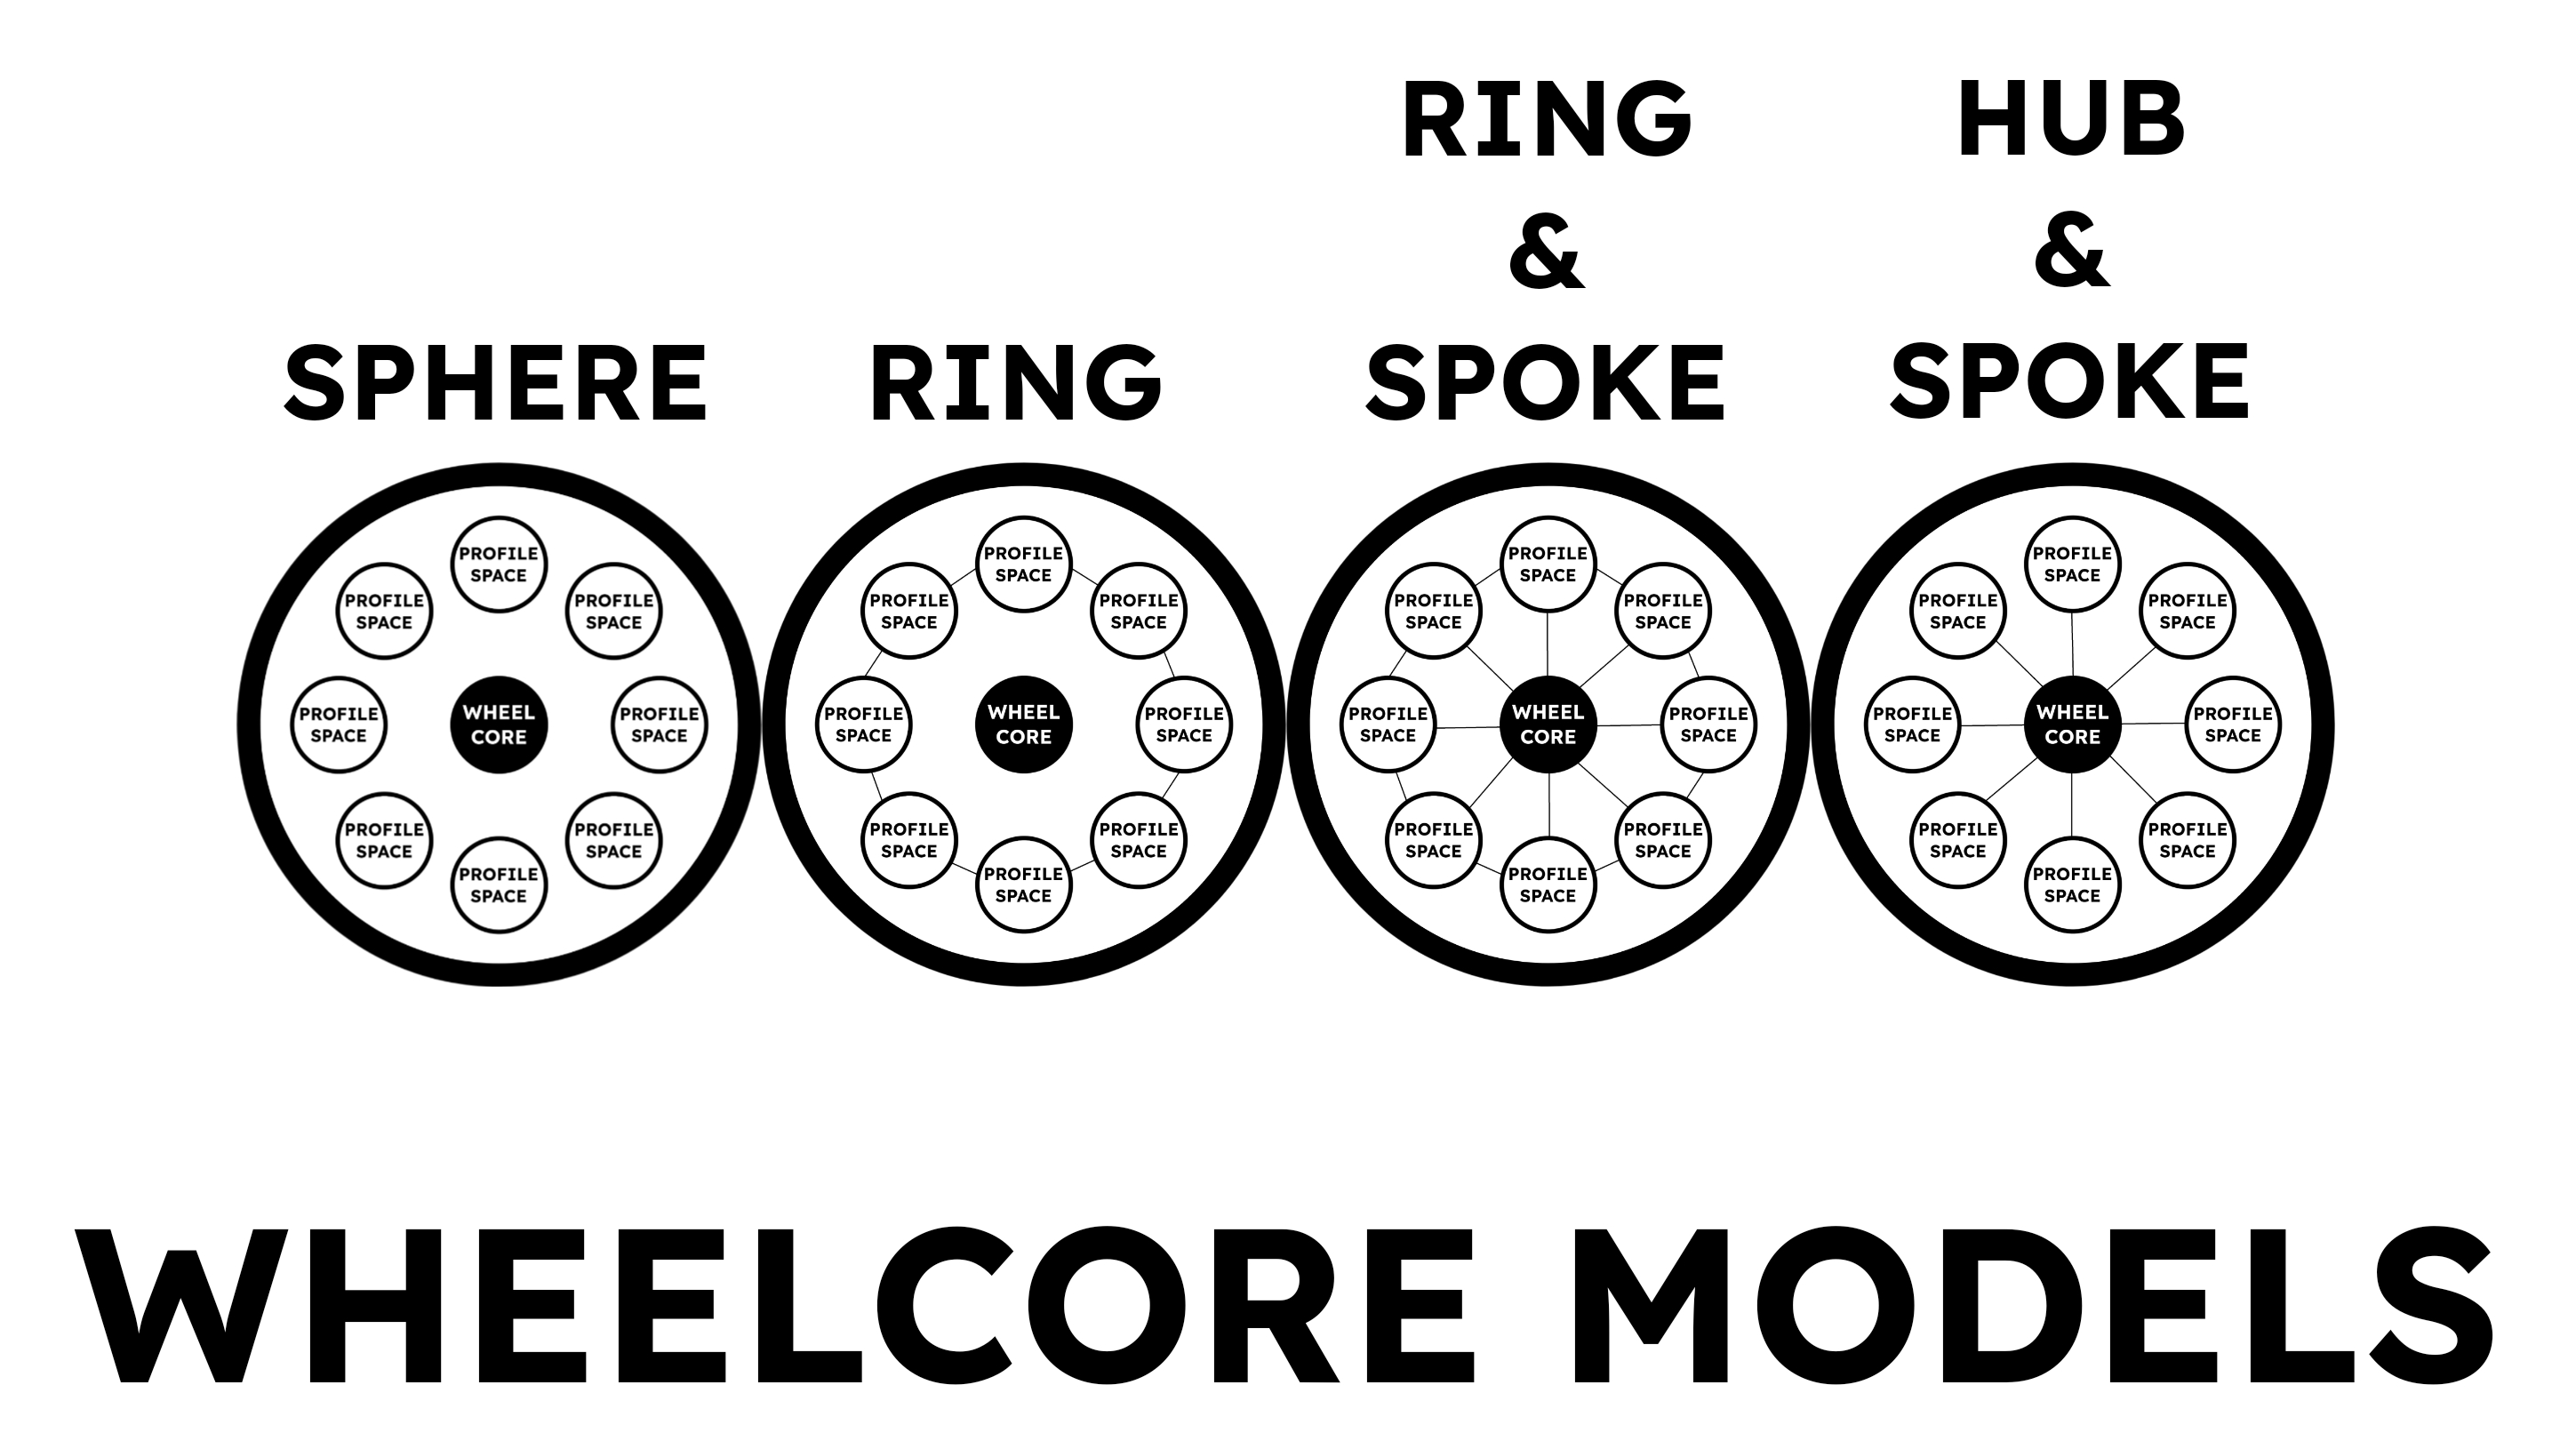
01: The Wheelcore
The first step is to find an existing wheelcore or create one yourself.
Without a wheelcore, you will not have a place on the web to generate your
profile space. If you are looking for a wheelcore to join, look for a
landhub (plenty of which can be readily found at this link:
https://www.asveora.social/p/landhubs.html) and browse its index of
wheelcores. Landhubs may or may not have the same selection of wheelcores
since every landhub usually has its own database, though sometimes it may
pull from a common database.
Once you have found a wheelcore
that fits your needs (is registered with a hosting service you like, has
enough web hosting space for what you want to do, has the model you want,
etc.), follow the instructions that the wheelcore outlines for contacting
the administration of the wheelcore. Do note that wheelcores may omit some
functionality from their core sites such as a hyperlinked members list
depending on the model. Every wheelcore will have their own preferred
methods of adding new members, so be sure to read carefully. After
corresponding with the administration of your selected wheelcore, you
should be provided with your very own Asveora Profile Address that
features your network username and details about web hosting space.
If you could not find a wheelcore that suited your needs or you simply
want to start your own, you will need to find a domain registrar and
purchase a domain ending in ".xyz" (the dedicated domain ending for
wheelcores in Asveora) that will serve as the root domain for your
wheelcore. Be sure to give your wheelcore a good name because domains cost
money.
Once you have bought a domain for your wheelcore you may
or may not need to purchase web hosting depending on where you bought your
domain from. Many domain registrars package in web hosting with domain
registration so you should not have to go find a separate web hosting
service most of the time. With both the wheelcore's domain in your hands
and web hosting acquired, you are all ready to get your profile space
configured!
02: The Profile Space
If you joined a wheelcore you should have already been provided with an
Asveora Profile Address. If you created a wheelcore you will need to make
yourself an Asveora Profile Address by adding your username to the DNS
records of your domain registrar as a sub domain which will look like
"asveoraprofile.wheelcorename.xyz" which is the format of an Asveora
Profile Address (APA). Once you have your APA you can now use your CMS or
IDE of choice to build your profile space. A profile space is simply the
website where your profile displayed. The way in which a profile space is
structured is entirely up to the Asveoran! Once you have created your
necessary site pages in an IDE or a CMS, publish the pages and link your
APA (the sub-domain declaring your username) to your website via your CMS
or some other means.
If you joined a wheelcore, you might have
to contact the administration to validate your sub-domain assignment since
domain registrars will want to ensure that you are authorized to own a
sub-domain of the root domain. Usually this is handled in step one when
communicating with the administration of a wheelcore, but some people
prefer to make the pages first and then setup the domain routing. Once
your APA is resolved to your profile space and you have set your main
profile page as the default landing then you are all set!
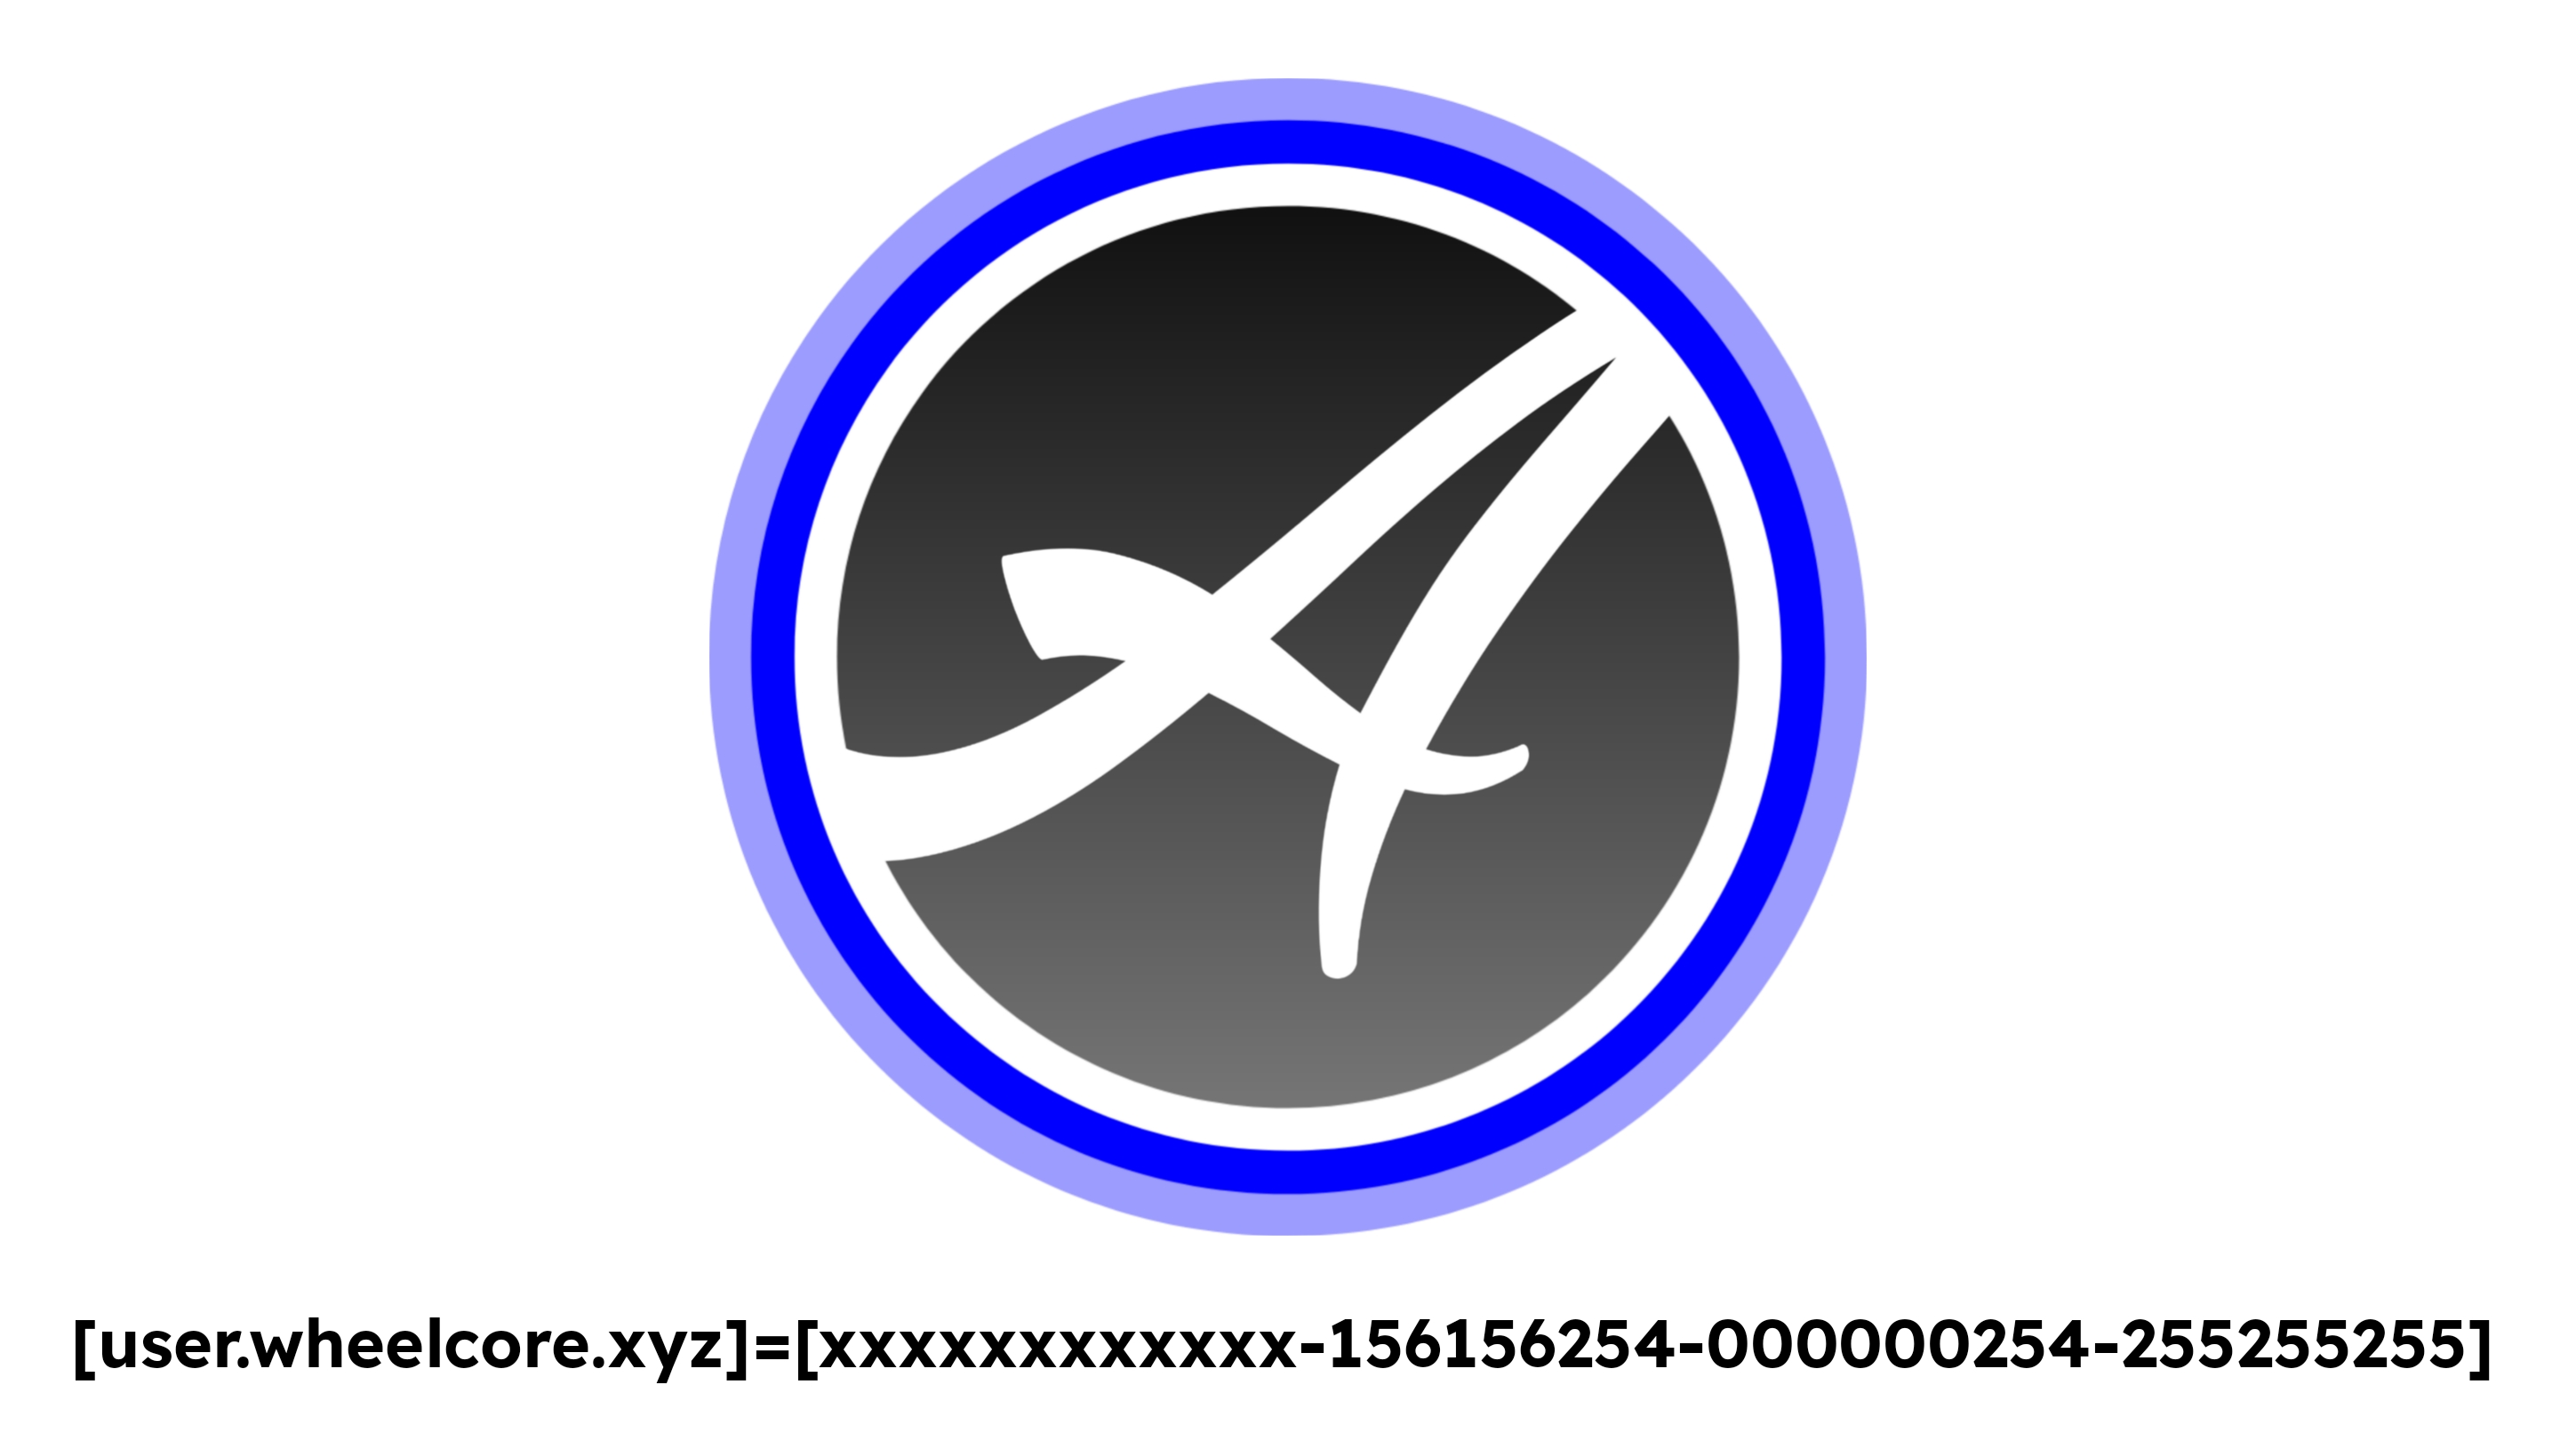
03: Asveora User ID
Since you have your APA already, you have one half of your Asveora User
ID already in your hands. The other half of your Asveora User ID, the
Asveora Profile Code (APC), is what we will talk about here primarily. An
Asveroa Profile Code is made up of four distinct parts that derive their
values from colors associated with your profile and your matrix account.
Every Asveoran is free to use whatever protocol they want, but they must
have a matrix account for citizenship authorization. This is done to
ensure that malicious figures are not making their way into Asveora's
network undetected.
To begin generating your Asveora Profile
code, find a matrix client you would like to use and access it via the web
or install it to your computer or phone. Once you have done so, find a
homeserver (listings for them can be found
here) to make your matrix account on. Some wheelcores have their own
homeservers that you can register with, so make sure to check the details
of your wheelcore to see. Optionally you can also make and run your own
homeserver. Once you have selected or created a homeserver, generate a 12
digit username code with a character string generator. This will be the
first part of your APC. Finish creating the acount and settle yourself
into your chosen matrix client. Then be sure to read
this
caution piece.
Now you will generate the rest of your APC. To
do this, you will need to create profile avatar (two depending on the
shape you decide on). Your profile avatar will need to include three
distinct colors in some pattern that can be readily visible. Whether it be
palette shapes, banding lines, rings, etc. The recommended avatar style is
a square avatar with colored rings that surround a circularly cropped
image. The profile template offered
here
in the "Local Data Names" package should have a preset available that can
be used in any graphics editing app to measure the recommended width of
each ring.
These colors should be solid and should not be gradients or have
transparency going on as it will mess up the verification process of your
APC horrendously. The reason why a square canvas with circular shapes is
recommended for avatars is because most communication clients display
avatars as either squares or circles. Not to mention that it is very
versatile to have a profile avatar that can be neatly presented as a
square or cropped and present as a circle. If you want a profile avatar
that is a complex polygon / on-traditional shape such as a triangle,
trapezoid, hexagon, etc. or want a profile avatar with advanced graphical
fx such as animated transparency, then you will have to create one version
of your profile avatar for your profile space and another for your
communication client.
The one you create for your profile space
can feature advanced graphical fx while the one for your communication
client should be the standard square canvas with rings. Now with your
three colors selected and implemented in your profile avatar in an easy to
see way, you will take the RGB codes of those three colors which will
complete your APC. With all the details on hand, your APC should look
something like this (xxxxxxxxxxxx-000000000-000000000-000000000) with x
representing your 12 character matrix username and 0 representing the
triple digit values of RGB for each of the three colors that you
selected.
Do note that with the clusters of 9 zeroes, every
three zeroes is a different color zone of RGB. So for instance if one of
your colors is blue which is 0 Red, 0 Green, 255 Blue, you would enter it
as 000000255. Once you have constructed your APC, place it somewhere
within your profile space where people can easily view it (preferably on
the main page of your profile space). You now have a complete Asveora User
ID that not only gives you a unique identifier (the APC) but also allows
people to find you on the internet (the APA). Asveora User IDs are always
structured in the following format:
[myusername.mywheelcore.xyz]=[xxxxxxxxxxxx-000000000-000000000-000000000]
04: Getting Verified
Now that you are a part of a wheelcore, have profile space setup, and
have your Asveora User ID configured, you are all ready for the
verification process! Simply select the link provided below and message the
account it links to in your preferred Matrix client! We deeply thank you for
becoming a citizen of Asveora and welcome you with open arms! Asveora
would be nothing without Asveorans and their dedication to making the
network the best world it can be!
https://matrix.to/#/@e4164dzxc4ca:matrix.org
Please keep in mind that it can take up to 48 hours for the bot to
see you upon joining for verification. Be sure to check the message
below for the status of the bot.
Status: The bot is currently online.